For anyone wrestling with web data, Puppeteer submit form automation is less a 'nice-to-have' and more a 'when-not-if' skill. Forms sit between you and a lot of the web: login walls, search boxes, signup flows, checkouts. If you scrape, test, or automate anything in a browser long enough, you'll inevitably find yourself filling and submitting them programmatically.
Today, we'll look at how to automate form submission with Puppeteer. Puppeteer is an open-source tool for browser automation, web scraping, and testing. Every task that you can perform with a Chrome browser can be automated with Puppeteer.
In this article, we'll cover:
- Automated form submission
- Using Puppeteer selectors to target form inputs
- Submitting a form with attachments
Let's dive in.
Note: If you are new to browser automation in Node.js, our Puppeteer web scraping tutorial is a good starting point.

Quick answer (TL;DR)
- Puppeteer does not expose a top-level page.fill() method, the way Playwright does; the fill action lives on the Locator API, available through page.locator()
- Use page.locator(selector).fill(value) when you want to set a field quickly.
- Use page.type(selector, text) when the site reacts to each keystroke.
- Submit with a button click, Enter, or form.requestSubmit().
- For file inputs, grab the element and call uploadFile().
- Wait for the page or a success state after submission, not just the click itself.
Getting started with Puppeteer
In this section, we will set up our project. As mentioned earlier, Puppeteer is a Node.js library. So we can simply add it to our node project with npm.
Let's start by creating a new folder.
# create a new folder and navigate inside it
mkdir puppeteer-forms
cd puppeteer-forms
Now initialize a Node project:
npm init -y
Note: We are using npm for this guide. Feel free to use yarn or pnpm, whichever you prefer.
Since we'll use modern import syntax instead of the older require() style, set the project type to module:
npm pkg set type="module"
Next, install Puppeteer.
npm install puppeteer
One nice thing about Puppeteer is that it ships with its own Chrome or Chromium binary, so you usually do not need to install a browser separately just to get started.
If you want to connect Puppeteer to an existing Chrome installation instead, install puppeteer-core instead and pass executablePath to launch().
Once the install finishes, create a file called index.js. This will be our main script.
mkdir index.js
To make sure everything works before we move to actual form automation, let's run a very simple test. We'll open a browser window, visit the ScrapingBee homepage, print the page title, and close the browser.
import puppeteer from 'puppeteer';

const browser = await puppeteer.launch({ headless: false });
const page = await browser.newPage();

await page.goto('https://www.scrapingbee.com/');
console.log('Page title:', await page.title());

await browser.close();
You'll notice that I set headless: false when launching the browser. That tells Puppeteer to open a visible browser window instead of running silently in the background. I like doing this while testing because it makes it much easier to see what the script is doing and catch bugs early.
Run the script with:
node index.js
You should see a Chromium window pop up, load the page, and close on its own. If you see "Page title: ScrapingBee – The Best Web Scraping API" in your terminal, everything is working, and we're ready to start filling out forms.
🐝 Tired of getting blocked while scraping the web? Join 20,000 users using our API to get the data they need. ScrapingBee handles headless browsers, rotating proxies, and anti-bot bypass for you, so you can focus on the data instead of the infrastructure.
Understanding the Puppeteer page.fill and Puppeteer page.type methods
If you are coming from Playwright, you are probably already familiar with page.fill(). But that is a Playwright method. In Puppeteer, there is no page.fill() on the Page class. The closest page-level method is page.type(), and Puppeteer offers fill() through its Locator API instead: page.locator(selector).fill(value).
This is the main thing people mix up, so let's break it down.
page.type() sends keyboard events for each character. It simulates real keystrokes and fires keydown, keypress, input, and keyup events for each character at a time, just like a real person typing into the field.
That's slower, but it's what you want when a site listens to typing events, when autocomplete needs to trigger, or when you're trying to look less like a bot.
await page.type('#email', 'user@gmail.com', { delay: 100 });
If you are looking for the Puppeteer page.fill method, the modern equivalent is locator-based: page.locator(selector).fill(value). Puppeteer's Locator.fill() fills the target element directly and supports input, textarea, select, and even contenteditable elements.
I use it when I only care about the final value in the field, and I do not need to simulate every keystroke.
await page.locator('#email').fill('user@gmail.com');
So which one should you use for a Puppeteer submit form script?
- Use page.type() when the site has live validation, autocomplete, search suggestions, or anti-bot monitoring.
- Use locator.fill() when you want cleaner, shorter automation and the page only needs the finished value.
Automating form submission
We verified Puppeteer is installed and working as expected. Now we can move forward with our first form submission. The first Puppeteer automation example is going to be super simple. We will navigate to Yelp and search for pizza delivery near Toronto, Canada.
First, let's visit yelp.com.
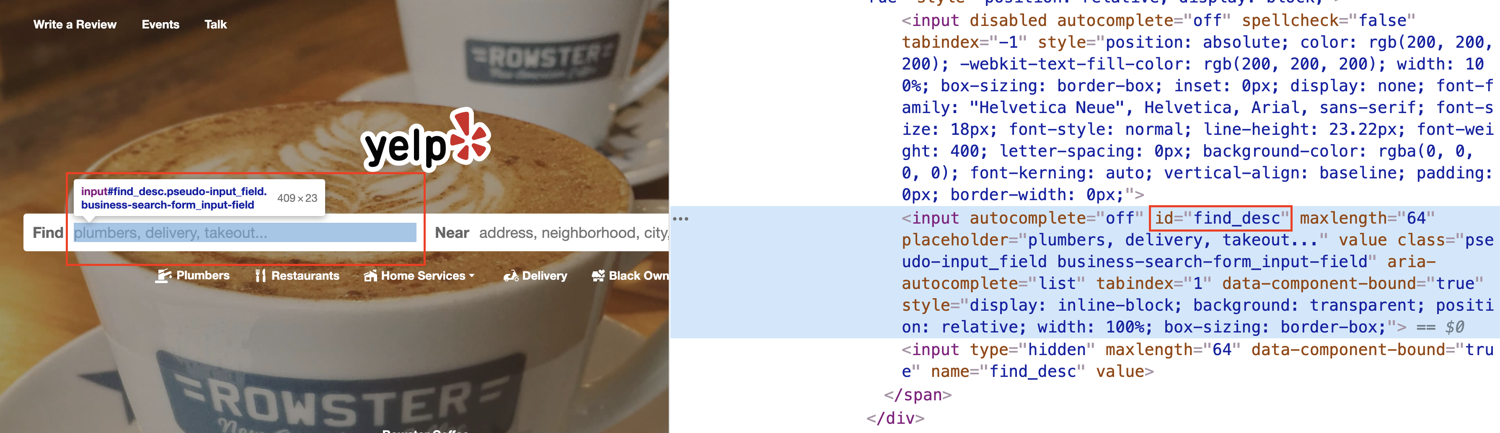
If we open our Dev Tools in Chrome and start inspecting the webpage, we can see that the find input has an id called find_desc.
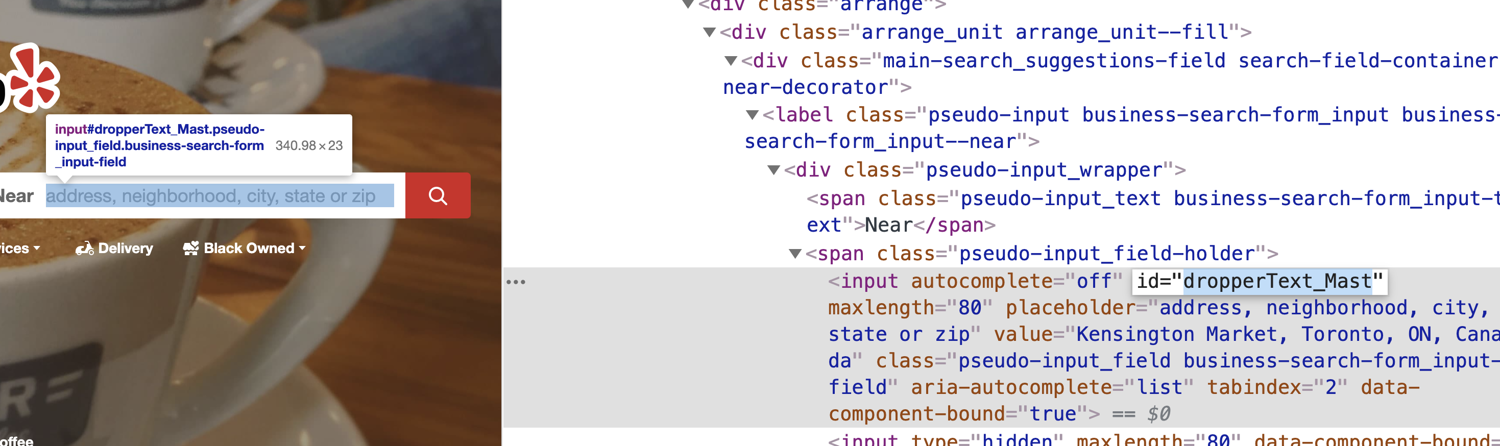
We can also see that the near input has an ID of dropperText_Mast and the search button has an id of header-search-submit. We can use this information to write our automation script.
import puppeteer from 'puppeteer';

const browser = await puppeteer.launch({ headless: false });
const page = await browser.newPage();

await page.goto('https://www.yelp.com', { waitUntil: 'domcontentloaded' });

// Fill the query and location fields
await page.locator('#find_desc').fill('Pizza Delivery');
await page.locator('#dropperText_Mast').fill('Toronto, ON');

// Click search and wait for the results page to load
await Promise.all([
  page.waitForNavigation({ waitUntil: 'domcontentloaded' }),
  page.locator('#header-search-submit').click(),
]);

console.log('Results URL:', page.url());
await browser.close();
After running this script, you'll see the browser open, type the queries, click search, and land on the results page. A few notes on what's happening here.
On lines 9 and 10, we are grabbing the inputs by their id. In Puppeteer, we can target DOM elements by their id, name, class, or any valid CSS selector. Here we are using the Locator API's fill() method to populate the inputs. The first part, page.locator('#find_desc'), targets the DOM element, and .fill('Pizza Delivery') is the string we want Puppeteer to insert for us.
We also use Promise.all to click the search button and wait for the page to navigate at the same time. We do this because we want to register the navigation listener before the click triggers it. If we await them separately, we can sometimes miss the navigation event entirely.
Note that we can also pass a class name as the selector. For instance, if find_desc was a class instead of an id, we could do this:
await page.type('.find_desc', 'Pizza Delivery');
Let's take a look at another example where we are going to target the input by name. For this next example, I am going to be using GitHub's login page.
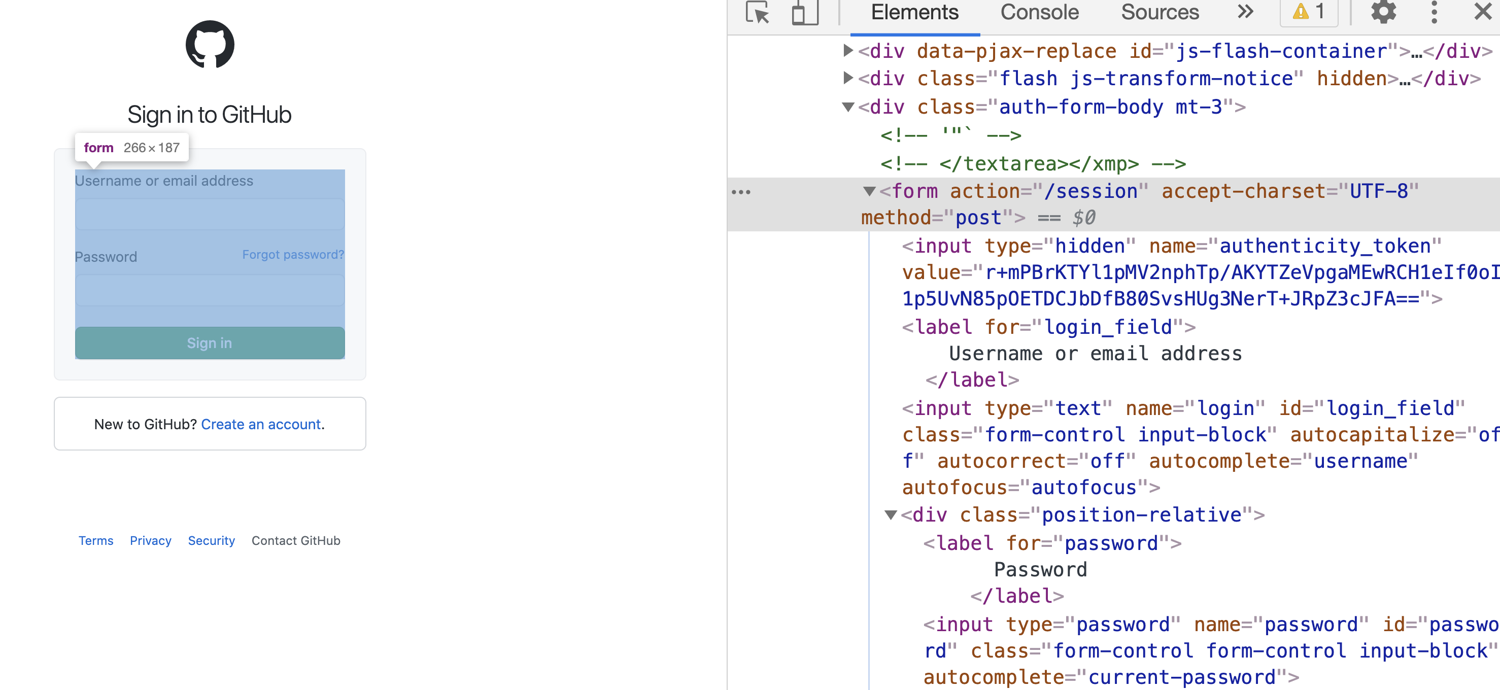
If we open Google Dev Tools and inspect the form here, we will see that this form inputs have a name property as well as id. Take a look at the code snippet below.
import puppeteer from 'puppeteer';

const browser = await puppeteer.launch({ headless: false });
const page = await browser.newPage();

await page.goto('https://github.com/login');

// Target fields by id and name attributes
await page.locator('input[id=login_field]').fill('your-username');
await page.locator('input[name=password]').fill('your-password');

// Submit by clicking the button of type=submit
await Promise.all([
  page.waitForNavigation({ waitUntil: 'networkidle2' }),
  page.locator('input[type=submit]').click(),
]);

console.log('Post-login URL:', page.url());
await browser.close();
As you can see we are using a different type of syntax here. Three different selector styles appear in that script: [id=...], [name=...], and [type=...]. Puppeteer does not care which one you pick; they all resolve to a DOM element. Feel free to use the syntax you feel comfortable with; there's no functional difference between them.
Submitting a form with attachments
Next, we are going to take a look at how we can upload a file with Puppeteer. We are going to use this demo form from W3Schools to demonstrate this.
Before we start, create a test file in your project folder so the script has something to upload. You can use any file you like, but for this example, we will call it myfile.pdf.
Let's see some code.
import puppeteer from 'puppeteer';

const browser = await puppeteer.launch({ headless: false });
const page = await browser.newPage();

await page.goto('https://www.w3schools.com/howto/howto_html_file_upload_button.asp');

const element = await page.$('input[type=file]');
await element.uploadFile('./myfile.pdf');

await browser.close();
Notice that for this Puppeteer submit form flow, we are selecting the input element with the page.$ function provided by Puppeteer. This returns the native DOM element, which is able to access all the native browser APIs. In the next line, we use the uploadFile function to attach a file from our local file system.
When you run the script, you will see that the file from the local path is getting attached to the form. A couple of practical notes from my experience:
- uploadFile does not validate that the file actually exists; hence, a typo in the path will fail silently so always double-check your file path.
- Also, always await the call; forgetting the await is probably the most common bug we see with this method.
For sites that use a custom "Browse" button instead of a visible <input type="file">, Puppeteer provides page.waitForFileChooser(). You trigger the file chooser dialog with a click, then pass your file path to it:
const [chooser] = await Promise.all([
  page.waitForFileChooser(),
  page.click('#custom-upload-button'),
]);
await chooser.accept(['./myfile.pdf']);
This covers most file upload patterns you'll encounter in the wild.
Best practices for using the Puppeteer page.fill API
Getting a form script to work once is easy, but keeping it working is what actually matters. Here are some handy tips I'll leave you with:
1. Use stable selectors
Start with selectors that are unlikely to change.
Good selectors usually come from id, name, for, or other attributes tied to the form itself. These tend to survive redesigns much better than long class chains or nth-child selectors.
If a selector feels fragile, open DevTools and check two things before using it: does it match the right element, and is it unique on the page?
2. Wait before interacting
Do not rush the page.
If you are using the Locator API, Puppeteer handles a lot of the waiting for you. But if you are using methods like page.type() or page.$(), make sure the element is there before you touch it.
This means using page.waitForSelector() before typing or clicking, and waiting for navigation or a success state after submission.
3. Keep anti-bot checks in mind
Form pages often sit behind login flows, signup pages, and checkout screens. These pages are monitored more closely than a typical content page, so anti-bot systems can be integrated into the workflow very quickly.
That means a script can fail even when your selectors and timing are fine. If you start seeing blocks, CAPTCHAs, or unexpected challenges, the issue may not be Puppeteer itself.
If your real goal is data extraction and you do not want to manage browsers, proxies, and blocking issues yourself, ScrapingBee's AI Web Scraping API can be a simpler option. It handles the browser layer for you and helps you extract web data without managing the full automation stack yourself.
Where to go from here
Puppeteer is a powerful tool. Its application extends to automating form submission, making Puppeteer submit form workflows much easier to build and scale. If you are looking to use Puppeteer for your web scraping solution, I highly encourage you to read through their official docs. I hope this article was informative and gave you a broad understanding of how to automate form submissions.
Ready to put this into practice? Sign up today to get started; you'll get 1,000 free API calls, which is more than enough to test your workflow and scrape hundreds of pages.
Before you go, check out these related reads:
- Puppeteer web scraping tutorial in Node.js
- How to download a file with Puppeteer
- Intercepting requests with Puppeteer
- Infinite scroll with Puppeteer
That's it for today, until next time.
FAQs
What is the difference between Puppeteer page.fill and page.type?
page.type simulates real keystrokes one character at a time. locator.fill() sets the value directly in one step. Use type when the page reacts to typing events. Use fill for everything else.
How do I trigger a Puppeteer submit form without clicking a button?
You can press Enter on a focused input or call form.requestSubmit() with $eval(). Both are useful when the visible submit button is unstable or hard to target.
Can I use Puppeteer page.fill for dropdowns and checkboxes?
For dropdowns, yes. locator.fill() supports select. For checkboxes and radios, use locator.click() instead.
Where can I find the latest Puppeteer page.fill API docs 2026?
Check the official Puppeteer docs at pptr.dev.
How do I handle file uploads in a Puppeteer input?
Select the file input and call uploadFile(). If the page launches a native chooser, use waitForFileChooser() and accept the file there.
Is Puppeteer page.fill faster than Puppeteer page.type?
Usually yes. fill sets the value in one step. page.type simulates realistic keystrokes so naturally, this is slower.