Node Unblocker is an open-source Node.js proxy library that fetches web pages on your behalf and rewrites their links so every subsequent request keeps flowing through your server. This tutorial explains what node-unblocker is, how to set it up, how to deploy it, how to point a scraper at it, and its limitations.
One caveat up front: node-unblocker still works, but its latest release (2.3.1) dates to mid-2024, and the project has seen only dependency bumps since. It's still a fine tool for simple proxying, and the second half of this article covers where it stops and what to use instead.
Key takeaways
- Node Unblocker is a free, open-source Node.js proxy library (AGPL-3.0), but its latest release, 2.3.1, shipped in mid-2024 and only dependency bumps have followed.
- It does not hide your server's IP from target sites and has no built-in IP rotation; pair it with proxies for scraping.
- Heroku's free tier is gone; deploy on Render's free tier or a cheap VPS instead.
- It fails on OAuth logins, JavaScript-heavy sites, and anti-bot protection; that's where a scraping API takes over.
What Is node-unblocker?
Node-unblocker advertises itself as a "Web proxy for evading internet censorship." It's a Node.js library with an Express-compatible API, allowing you to get your proxy up and running quickly. Because of its JS interface, it's highly versatile and can be used in many ways.
Technically, it's a URL-prefix proxy. You reach a target through a path like /proxy/https://example.com/, node-unblocker fetches that page server-side, rewrites the URLs in the HTML and CSS on the way back, and injects a small client-side script, so links, assets, and further requests keep pointing at the proxy instead of the origin.
That rewriting is what lets a proxied site keep working as you click around. JavaScript responses pass through unmodified, which is part of why script-heavy sites break.
Does it hide your IP address? Not from the target site. The destination sees your host server's IP on every request; node-unblocker only hides your traffic from your own local network (useful for getting around a network-level block, not for staying anonymous to the site you are scraping). There is no IP pool and no rotation built in.
The current release is 2.3.1, published to npm in mid-2024 under the AGPL-3.0 license. It still installs and runs, but treat it as abandonware: the recent repository activity is automated dependency updates rather than new features or fixes, and it pulls a few hundred npm downloads a week.
Implementing node-unblocker
To set up node-unblocker, make sure you've got Node.js and npm installed on your system. You can do that by following the official guide from the Node.js website or with a version management tool like nvm.
Creating the Script
First, create a new folder, initialize an npm project, and install necessary dependencies.
mkdir proxy
cd proxy
npm init -y
npm install unblocker express
Express will allow you to create a web server quickly, while unblocker is the npm package name housing node-unblocker.
With the necessary packages installed, you can start implementing your proxy in a new index.js file.
Start by require()-ing your dependencies.
const express = require("express");
const Unblocker = require("unblocker");
Next, create an Express app and a new Unblocker instance.
// ...
const app = express();
const unblocker = new Unblocker({ prefix: "/proxy/" });
node-unblocker accepts a wide range of options through its config object. You can configure pretty much all aspects of the library, from request details to custom middleware. In fact, because most of the proxy's functionality is implemented as middleware, you can also selectively enable its features as you see fit.
In the above snippet, only the prefix property is set. This will later indicate at what path the proxy can be accessed, in this case - /proxy/.
Because of the Express-compatible API, all you need to do to connect the proxy instance with your Express server is to call the use() method.
// ...
app.use(unblocker);
Finally, start your Express server using the listen() method.
// ...
app.listen(process.env.PORT || 8080).on("upgrade", unblocker.onUpgrade);
console.log("Proxy is running on port:", process.env.PORT || 8080)
The server will now run on the port set by the PORT environment variable, while defaulting to 8080. Additionally, the upgrade event handler (onUpgrade method) has been attached to the server. This informs the proxy when the connection protocol has been upgraded (or changed) from the established HTTP to, say, WebSocket, enabling proper handling of such connections.
This is how your script should look:
const express = require("express");
const Unblocker = require("unblocker");
const app = express();
const unblocker = new Unblocker({ prefix: "/proxy/" });

app.use(unblocker);
app.listen(process.env.PORT || 8080).on("upgrade", unblocker.onUpgrade);
console.log("Proxy is running on port:", process.env.PORT || 8080);
A note on versions: this code was tested on Node.js 22 with both Express 4 and Express 5 and runs unchanged, so a fresh npm install unblocker express (which now pulls Express 5) works out of the box.
Testing the Proxy
Test the proxy implementation by running the script using Node.js.
node index.js
If everything works correctly, you should see the console.log() message in your terminal.
To verify the proxy is working, take a URL and prefix it with localhost:[PORT]/proxy/, for example: http://localhost:8080/proxy/https://www.scrapingbee.com/. In your DevTools, you should see that all requests are going through the proxy.
In case any issues arise with the proxy, set the DEBUG environment variable to see detailed information on every request:
DEBUG=unblocker:* node index.js
Deploying node-unblocker
A proxy running on localhost only helps the machine it runs on. To use it as a real service, you need to deploy it to a server with a public URL.
The original version of this tutorial deployed to Heroku's free tier, but that free tier no longer exists (Heroku's cheapest Eco dynos now start at $5/month). The closest free replacement today is Render, so that is the primary walkthrough below, with a couple of alternatives after it.
Acceptable Use Policy
Before you deploy any web scraping or proxy application to a remote server, you should know its Acceptable Use Policy. Not all providers allow this kind of application to be hosted on their servers, and many allow it only under strict conditions. A public, open proxy is the kind of workload hosts scrutinize most, because it can be abused by anyone who finds the URL.
Render's acceptable use policy, like Heroku's before it, prohibits misrepresenting your identity and bypassing other sites' access or usage restrictions. Read your provider's current policy, restrict the proxy to the sites you actually need (node-unblocker has no allowlist option, but a few lines of custom requestMiddleware can enforce one), respect each target's robots.txt, and send a descriptive user-agent. Keep this in mind on any host you choose.
Deploying to Render's free tier
Render deploys straight from a Git repository, so there is no platform-specific CLI to learn.
- Your
npm init -yalready created apackage.json; add anenginesfield and astartscript, and pin the dependencies so the host installs the same versions you tested:
{
  "name": "proxy",
  "version": "1.0.0",
  "main": "index.js",
  "private": true,
  "engines": {
    "node": "22.x"
  },
  "dependencies": {
    "express": "^5.1.0",
    "unblocker": "^2.3.1"
  },
  "scripts": {
    "start": "node index.js"
  }
}
The start script tells Render how to run the app, and the engines field pins the Node.js version. Node 22 is an LTS release supported through April 2027; the original tutorial pinned Node 16, which reached end-of-life in September 2023 and should not be used for a new deployment.
Push the project (your
index.jsandpackage.json) to a GitHub or GitLab repository. Add a.gitignorecontainingnode_modules/first so you do not commit the installed packages.In the Render dashboard, choose New Web Service and connect that repository.
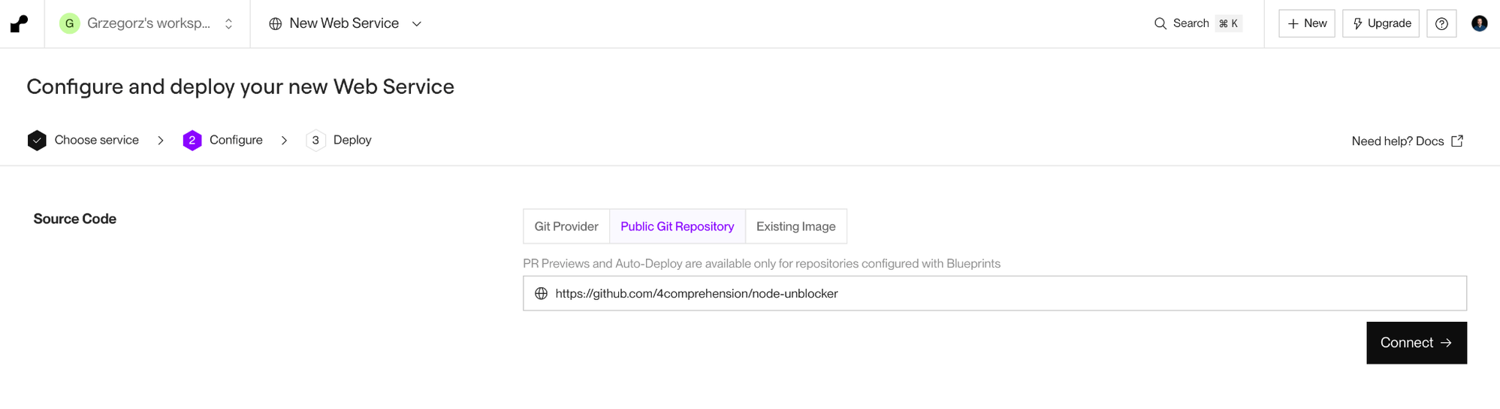
- Set the build command to
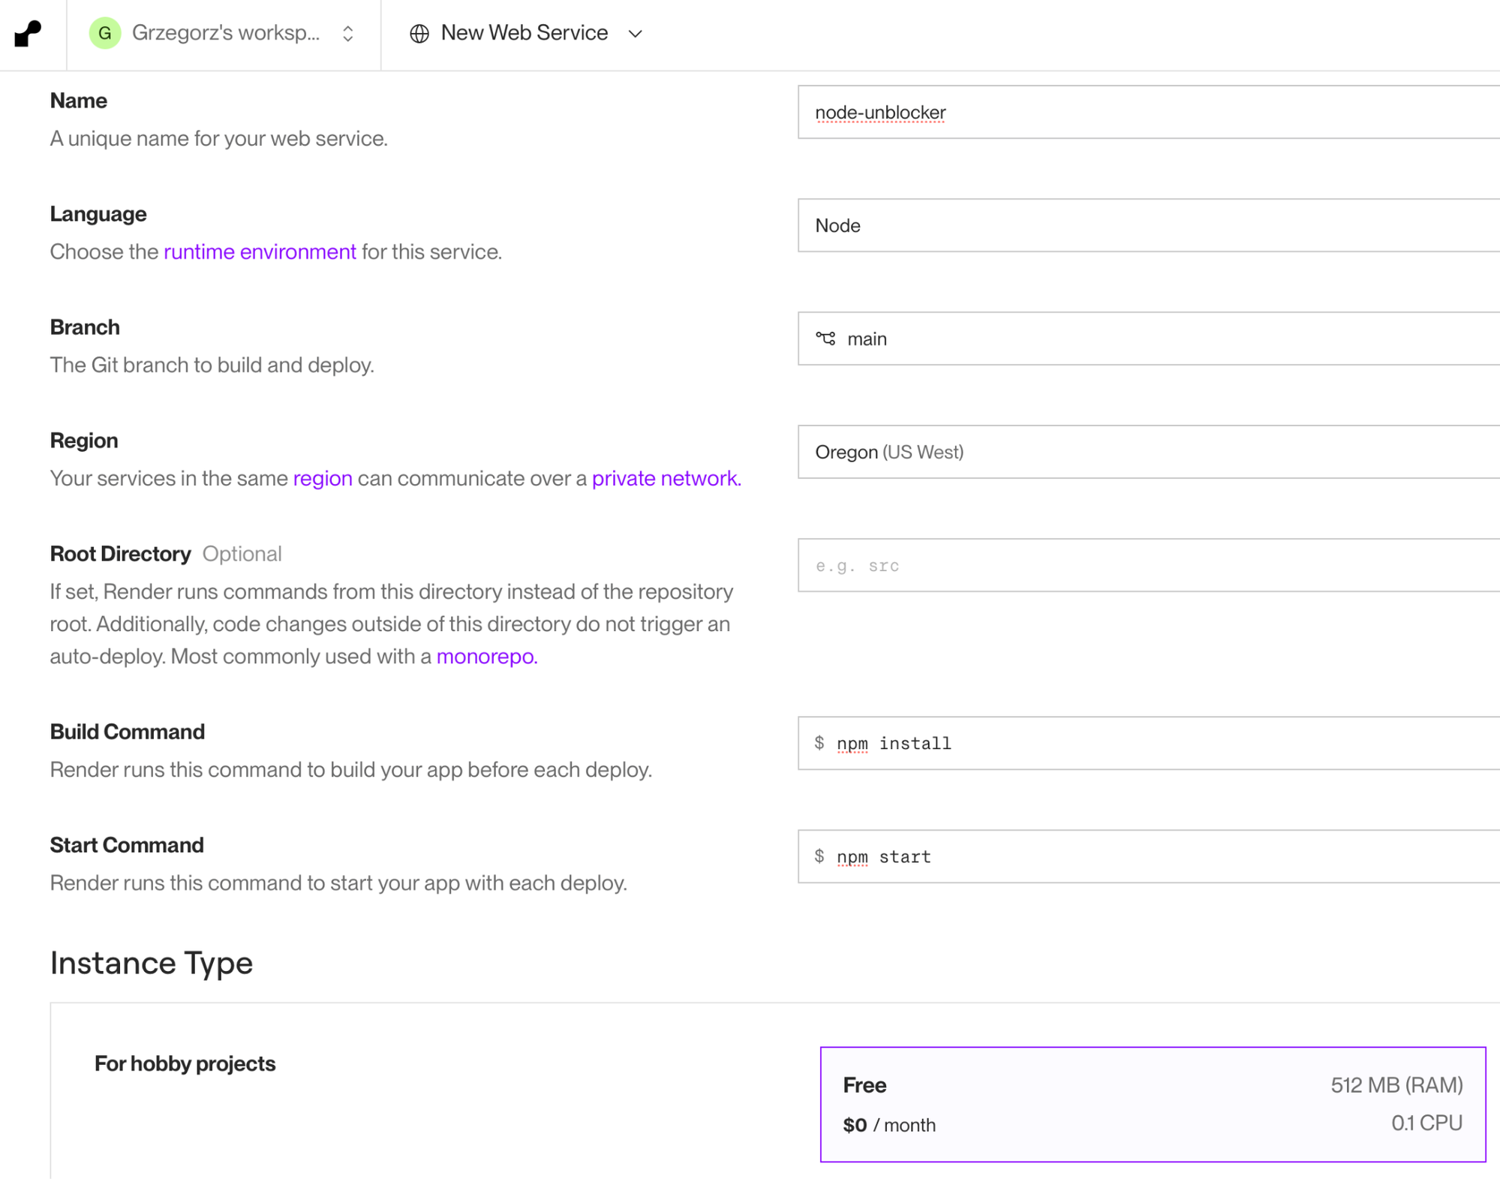
npm installand the start command tonpm start, then pick the Free instance type:
- Deploy. Render builds the app and assigns a public URL like https://your-proxy.onrender.com.
Test it exactly as you did locally, by prefixing a target URL with your Render URL and the proxy path:
https://your-proxy.onrender.com/proxy/https://www.scrapingbee.com/
Two things to know about the free tier: a free web service spins down after 15 minutes without traffic (the next request pays a cold-start delay while it wakes), and each workspace gets 750 free instance-hours per month. Both are fine for testing and light use, but a proxy you depend on should move to a paid instance or a VPS.
Other hosts: VPS, Heroku, and Vercel
- A cheap VPS (a small instance on a provider like Hetzner or DigitalOcean runs a few dollars a month) gives you a fixed IP and no idle spin-down. You manage the OS and the process yourself (a process manager like
pm2or a systemd unit keeps the app alive), which is more work than Render but more predictable for production. - Heroku still works if you already use it; there's simply no free option now, so expect to pay from $5/month for an Eco dyno. The deploy flow is the same idea as Render: connect a Git repo or push with the Heroku CLI, the same
package.jsonapplies, and the proxy ends up at a your-app.herokuapp.com URL. - Vercel is popular for Node apps but is a poor fit here. It runs code as short-lived serverless functions with execution-time limits and no long-lived server process, so a streaming proxy that holds connections open (and handles WebSocket upgrades) does not map cleanly onto it. Prefer a platform that runs a persistent server, like Render or a VPS.
Once your proxy has a public URL, you can use it as a standalone service or point a scraper at it, which is what the next section covers.
Web-scraping using node-unblocker
On its own, node-unblocker just relays pages. If you came here to scrape, you want to drive it from code, so here is a Puppeteer example that loads a target through the proxy and extracts data from it.
The trick is the URL: you navigate to your proxy plus the prefixed target, not to the target directly.
Install Puppeteer first (it downloads a bundled Chromium):
npm install puppeteer
The example points at the local instance from earlier; once you have deployed, swap in your public URL (like https://your-proxy.onrender.com/proxy/).
const puppeteer = require("puppeteer");

const PROXY = "http://localhost:8080/proxy/";
const TARGET = "https://books.toscrape.com/";

(async () => {
  const browser = await puppeteer.launch({ headless: true });
  const page = await browser.newPage();

  await page.goto(PROXY + TARGET, { waitUntil: "networkidle2" });
  const titles = await page.$$eval("article.product_pod h3 a", (links) =>
    links.slice(0, 3).map((a) => a.getAttribute("title"))
  );
  console.log("First 3 titles via proxy:", titles);

  await browser.close();
})();
Running this prints the first few book titles (in testing, "A Light in the Attic", "Tipping the Velvet", and "Soumission"), pulled through the proxy instead of fetched from the site directly. For more on driving a headless browser, see our guide to web scraping with Node.js.
To spread traffic across more than one exit point, run several node-unblocker instances and rotate between their URLs. The important caveat: rotation only buys you different IPs if the instances live on different hosts. Three instances on one server all share that server's single IP. Watch the platform, too: a single provider often routes a whole region through one set of egress IPs (Render is one example), so spread instances across regions or providers rather than spinning up three services in the same place.
const puppeteer = require("puppeteer");

const PROXIES = [
  "https://proxy-eu.onrender.com/proxy/",
  "https://proxy-us.example-vps.net/proxy/",
  "https://proxy-ap.example-vps.net/proxy/",
];

(async () => {
  const browser = await puppeteer.launch({ headless: true });
  const targets = [
    "https://books.toscrape.com/",
    "https://quotes.toscrape.com/",
    "https://httpbingo.org/ip",
  ];

  for (let i = 0; i < targets.length; i++) {
    const proxy = PROXIES[i % PROXIES.length]; // round-robin
    const page = await browser.newPage();
    await page.goto(proxy + targets[i], { waitUntil: "networkidle2" });
    console.log(`Fetched ${targets[i]} via ${proxy}`);
    await page.close();
  }

  await browser.close();
})();
This is round-robin rotation across proxy instances. It helps you avoid hammering one endpoint, but it is not a substitute for a real rotating-proxy pool, which the limitations below get into.
Limitations of node-unblocker
While the implementation and deployment of node-unblocker are relatively straightforward, the proxy comes with a set of limitations that are hard, if not impossible, to overcome. Additionally, the maintenance effort and other issues you might encounter make running a self-managed proxy a hassle.
On the other hand, a service like ScrapingBee is fully managed, well-supported, and already battle-tested in production environments.
To give you a better look at how these two compare, here are some of node-unblocker's limitations that you should be aware of.
OAuth Issues
The proxy is unlikely to work well with websites using OAuth forms. In fact, this applies to anything using the postMessage() method. This issue isn't significant, but is unlikely to be fixed in the future. What only works currently are standard login forms and most AJAX content.
Issues with Complex Websites
Popular but complex websites like Discord, Twitter, or YouTube (semi-working example available) won't work correctly. The content, or part of it, might not show up or a request might not be successful, among other issues. Currently, there's no timeline as to when (if ever) this will be fixed.
Two deeper reasons sit behind that. First, node-unblocker rewrites markup but does not run a browser, so it does not render client-side JavaScript; sites that build their content in the browser arrive half-empty unless you drive them with a headless browser like Puppeteer on top.
Second, it does nothing to defeat anti-bot systems. Cloudflare, DataDome, and similar defenses, along with CAPTCHA challenges, see the requests coming from a single server IP with no browser fingerprint and block them.
No IP rotation or anonymity
This is the limitation that catches scraping projects off guard: every request leaves from your server's one IP address. node-unblocker has no proxy pool and no rotation, so the moment a target rate-limits or bans that IP, the whole setup is dead until you redeploy elsewhere. Running multiple instances only helps if each one sits on a different host with a different address.
For anything that needs many IPs, you have to pair node-unblocker with an external pool of rotating and residential proxies, or move to an API that manages rotation for you.
Maintenance Effort
Like any other complex service, proxies and web scraping apps require a lot of effort to run and maintain. You have to comply with the policies of cloud providers and fully manage your proxy instances, among other issues. All these factors contribute to a big overhead - especially when running large proxy clusters.
Alternatives to node-unblocker
If node-unblocker stops where your project needs to keep going, three paths lead further, in rough order of how much work you hand off:
- A headless browser with rotating proxies: Puppeteer or Playwright renders JavaScript the way a real browser does, and feeding it a pool of rotating proxies gives you the IP diversity node-unblocker lacks. You still run and maintain the browsers and the proxy pool yourself.
- A commercial "web unblocker" API: the name is easy to confuse with a plain proxy, so to be precise: a standard proxy only swaps your IP, while a web unblocker API bundles managed rotating proxies, a real headless browser for JavaScript rendering, and automatic anti-bot and CAPTCHA handling behind a single endpoint, retrying and re-routing until a request gets through. Its documentation usually covers the headless-browser setup and per-request options, so it handles the parts node-unblocker leaves to you.
- A full scraping API: the same idea taken one step further: you send a URL and get back the page (or structured data), with proxies, browser, and anti-bot defenses handled for you.
So the choice comes down to a simple trade-off: If you enjoy running infrastructure and your targets are cooperative, self-hosting node-unblocker is fine. If you just want the data and your targets fight back, hand off the proxy layer.
That is where ScrapingBee fits: it is that third option, a web scraping API that handles proxy rotation, JavaScript rendering, and CAPTCHAs so you send a URL and get the page, with no proxy fleet to run. Our guide on web scraping without getting blocked covers the same problems from the other side. ScrapingBee's free trial includes 1,000 API calls with no credit card required.
Frequently asked questions (FAQs)
Is node-unblocker free?
Yes. The unblocker package is open-source under the AGPL-3.0 license. You still pay for hosting (Render's free tier works for testing) and for any proxies you add.
The library ships with no IP pool or rotation, so a real scraping setup still costs money.
Does node-unblocker hide your IP address?
Not from the target website. It hides your browsing from your local network, but the destination still sees your host server's IP on every request.
Is node-unblocker still maintained?
Barely. No release has shipped to npm since 2.3.1 in mid-2024, and the repo sees only automated dependency bumps, with a few hundred weekly downloads.
Basic proxying still works, but treat it as feature-frozen: no fixes or new capabilities are coming, so plan around that before relying on it in production.
Can node-unblocker bypass Cloudflare or CAPTCHAs?
No. Sites behind Cloudflare, DataDome, or CAPTCHAs block it, and OAuth sign-in flows (Google, for example) break inside it. Complex apps like YouTube also fail.
It works on simple to moderately complex sites; for protected targets you need a headless browser with stealth tooling or a scraping API.
Is using node-unblocker legal?
The software itself is legal; what matters is how you use it. Bypassing access controls or harvesting personal data can cross legal lines, so check the target site's terms of service and robots.txt, your hosting provider's acceptable use policy, and local law before you scrape or proxy through it.
To mask or rotate IPs, pair it with residential or datacenter proxies, or use a managed scraping API.