Crawl4AI is an open-source, async Python crawler built on Playwright that turns web pages into clean, LLM-ready Markdown (and structured JSON) for RAG pipelines and AI agents. It is Apache 2.0 licensed and, with north of 70,000 GitHub stars… yes, one of the most-starred web crawlers in the ecosystem.
If Scrapy or BeautifulSoup has handed you raw HTML and then spent an afternoon stripping nav bars and cookie banners before an LLM could read it, I'll say Crawl4AI is the tool that helps you skip that step.
By the end of this Crawl4AI guide, you'll be able to crawl a page to clean Markdown, extract structured data with and without an LLM, deep crawl a whole site section, wire the output into a RAG pipeline, and know exactly when its proxy and anti-bot story runs out of road (and what to reach for when it does).
Key takeaways
- Crawl4AI is a free, open-source Apache 2.0 async Python crawler that outputs LLM-ready Markdown for RAG
- Basic crawling and Markdown need no API key or LLM; only LLM extraction does, and that can run free via Ollama
- fit_markdown strips boilerplate to cut token costs, but it is empty until you attach a content filter
- Crawl4AI offers stealth and proxy options, but no managed proxies or guaranteed anti-bot bypass. Bring your own proxies or a managed layer at scale
What is Crawl4AI?
Crawl4AI is an open-source Python framework that crawls web pages and hands you clean, LLM-ready Markdown or structured JSON instead of raw HTML. It is built on Playwright for browser automation and asyncio for concurrency, maintained by a developer who goes by unclecode, and released under the Apache 2.0 license.
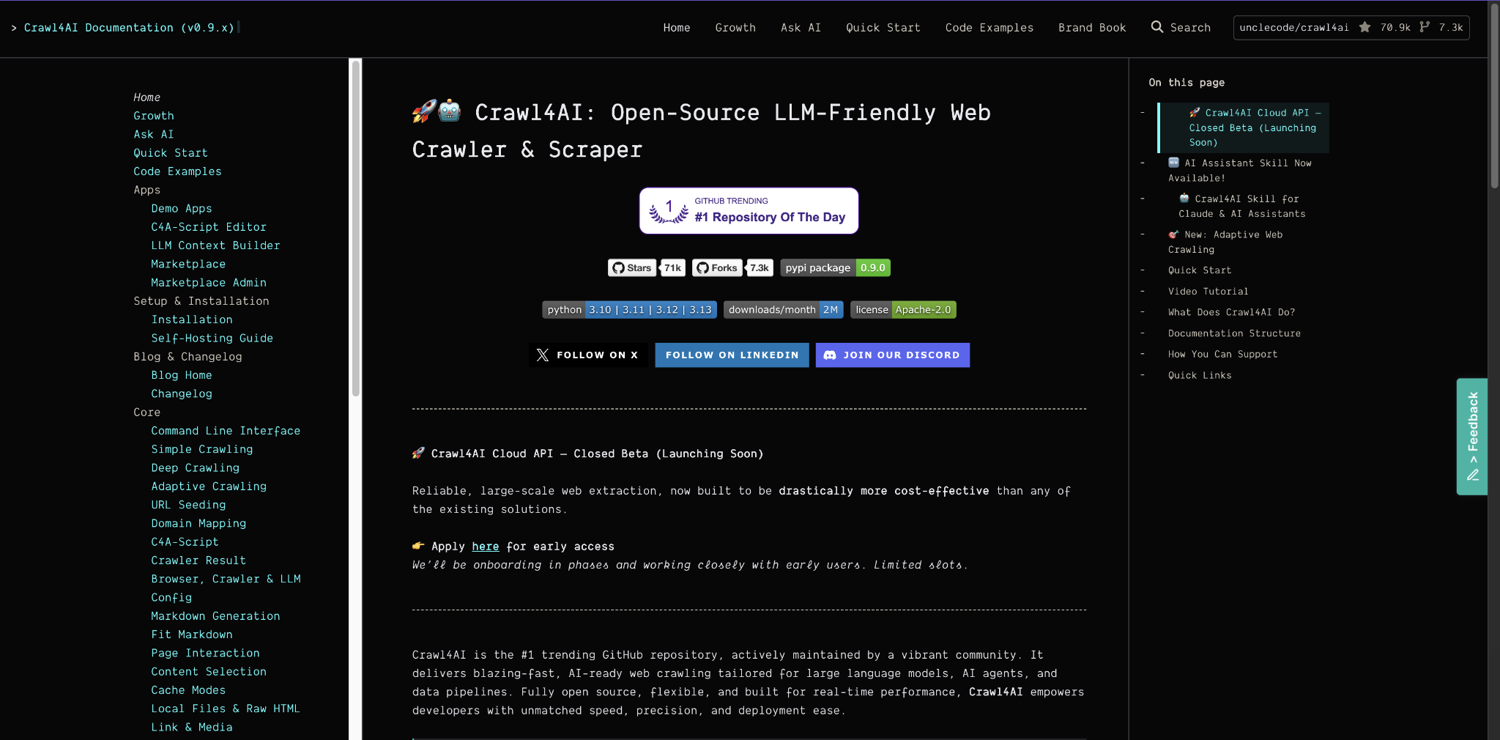
When I was writing this, Crawl4AI sits at just over 71,000 GitHub stars, putting it among the most-starred crawlers anywhere, and the current release is v0.9.1 (worth checking, since the library moves fast).
The one-sentence version of why it exists: Scrapy and BeautifulSoup hand you raw HTML that you then have to parse and clean yourself, while Crawl4AI hands you the cleaned, structured output that an LLM can read directly.
If your endgame is a RAG index or an AI agent rather than a database of scraped fields, that difference is the whole point.
Key features of Crawl4AI
Crawl4AI bundles a lot into a single library, but a handful of features are why people reach for it over a generic scraper. These are the ones that show up in real projects.
Here is what you get:
- LLM-ready Markdown output: Every crawl produces clean Markdown by default, with an optional filtered version (fit_markdown) that strips boilerplate to save tokens. No parser to write.
- Full JavaScript rendering: Because it runs on Playwright, it launches a real Chromium browser and renders React, Vue, and other single-page apps before extracting, so dynamic content is not a problem.
- Two extraction paths: CSS/JSON extraction is fast, deterministic, and free (no LLM, no key). LLM extraction handles messy or free-form pages where selectors break. You choose per job.
- Deep and adaptive crawling: It can follow links across an entire site section using breadth-first or best-first strategies, and its adaptive mode stops crawling once it has gathered enough information for your query.
- Async by design: The AsyncWebCrawler fans out concurrent requests through asyncio, so crawling hundreds of pages does not mean hundreds of threads.
Taken together, those features are why Crawl4AI reads less like a scraper and more like the front end of an AI data pipeline. Rest assured, in the rest of this guide, I'll walk you through each one with code you can run.
What's the difference between Crawl4AI and Firecrawl?
The comparison almost everyone searching for Crawl4AI eventually encounters is between Crawl4AI and Firecrawl. Crawl4AI is a self-hosted library you run yourself, while Firecrawl is a managed API that you call. They solve the same problem (turn web pages into LLM-ready data) from opposite directions.
In my experience, here are the key differences you need to know:
| Crawl4AI | Firecrawl | |
|---|---|---|
| License | Apache 2.0 (permissive) | AGPL-3.0 core (copyleft; official SDKs are MIT) |
| Delivery model | Self-hosted Python library | Managed API |
| Cost | Free software; you pay for infra, proxies, and any LLM calls | Credit-based monthly tiers (free tier available; verify current pricing) |
| Setup effort | Install, manage Playwright, bring your own proxies | Sign up, call the API |
| Output | Clean Markdown, JSON, extracted content | Clean Markdown, JSON |
| Anti-bot | Stealth and proxy hooks, but you supply the proxies and the unblocking | Managed unblocking included |
My honest verdict:
- Choose Crawl4AI when you want control, data sovereignty, and zero license cost, and you are willing to run and maintain the browser and proxy layer yourself.
- Choose a managed API like Firecrawl (or ScrapingBee) when you want zero ops and reliable unblocking, and you would rather pay per credit than babysit infrastructure.
A few adjacent tools are worth knowing about so you can place Crawl4AI on the map. Scrapy and BeautifulSoup sit a level lower: they are excellent at crawling and parsing raw HTML, but they do not produce LLM-ready output on their own.
If you want the full landscape, our roundup of the best AI web scrapers covers where each one fits.
How to install Crawl4AI
Installing Crawl4AI requires three commands, and the two extra ones are why most "it does not work" posts exist. You need Python 3.10 or newer (the current release requires it, even though older tutorials still say 3.8), and the installation pulls in Playwright, which then has to download a browser before anything will crawl.
Let's see the process.
1. Install Crawl4AI in three commands
To install Crawl4AI, run these in order:
pip install -U crawl4ai
crawl4ai-setup
crawl4ai-doctor
Here is what each one does, because skipping the middle command is the single most common mistake I've seen:
- pip install -U crawl4ai installs the latest version of the Python package. On its own, this is not enough to crawl anything. It gives you the library, not the browser it drives.
- crawl4ai-setup downloads and configures the Playwright browser (Chromium) that Crawl4AI launches under the hood. This is the step people skip, and then the first crawl fails with an "executable does not exist" error.
- crawl4ai-doctor runs a health check and tells you whether the environment is ready.
When I ran it before the browser finished installing, it caught exactly that and printed the fix:
[INIT].... → Running Crawl4AI health check...
[ERROR]... × Test failed: BrowserType.launch: Executable doesn't exist
   ...
   Please run the following command to download new browsers:
       playwright install
That is the whole install for most people. There is also a Docker image if you would rather run Crawl4AI as a service (useful for the RAG and deployment setups later in this guide), but for following along here, the pip install is simpler and what the rest of the code assumes.
2. Know what to do when you encounter installation errors
Most Crawl4AI installation failures come down to the browser, the operating system, or the environment you are running in.
Here are the five issues I've seen come up most often, along with their fixes.
Fixing a missing browser with a manual Playwright install
If crawl4ai-setup did not complete cleanly and your first crawl throws Executable doesn't exist, install the browser directly.
This is the exact command crawl4ai-doctor points you to:
python -m playwright install chromium
Fixing missing system libraries on minimal Linux
On slim Docker images, bare cloud VMs, and CI runners, Chromium will not launch because the base OS is missing shared libraries it depends on. The symptom is a launch error listing missing .so files.
So, you'll need to install Playwright's system dependencies:
python -m playwright install-deps chromium
# or, if you do not have permission for that:
sudo apt-get install -y libnss3 libnspr4 libatk1.0-0 libatk-bridge2.0-0 libcups2 libdrm2 libxkbcommon0 libxdamage1 libgbm1 libasound2
Fixing asyncio event-loop error in notebooks
If you run Crawl4AI in a Jupyter notebook or an IDE that already runs an event loop, you will encounter a RuntimeError: asyncio.run() cannot be called from a running event loop.
Crawl4AI is async, and the notebook already has a loop running.
Patch it with nest_asyncio:
import nest_asyncio
nest_asyncio.apply()
# now await crawler.arun(...) or asyncio.run(main()) works in the notebook
Fixing Windows event-loop and encoding issues
On Windows, Crawl4AI's asyncio backend can throw a NotImplementedError on older Python builds.
Set the selector event-loop policy at the top of your script:
import asyncio, sys

if sys.platform == "win32":

    asyncio.set_event_loop_policy(asyncio.WindowsSelectorEventLoopPolicy())
If console output shows garbled characters, run Python with UTF-8 mode (python -X utf8 your_script.py), since Windows terminals do not default to UTF-8.
The Docker gotcha before you deploy
The Docker image runs a Redis instance internally. If you expose the container without configuring it, you can hit a Redis "protected mode" error complaining that no password is set.
This trips people up on cloud deploys (DigitalOcean and similar) more than local runs. If you are just learning Crawl4AI, stay on the pip install and skip Docker until you need a deployed service; we come back to deployment in the RAG section.
Once crawl4ai-doctor reports a healthy environment, you are ready for the part that makes Crawl4AI worth the setup: one short script that returns clean Markdown.
Running your first Crawl4AI crawl in Python
The whole pitch of Crawl4AI fits in about ten lines of Python. You point an AsyncWebCrawler at a URL, call arun, and print the Markdown it hands back. No parser, selector tuning, or cleanup pass.
Here is a complete script. It crawls example.com, a deliberately boring and stable target, so the copy-paste works on the first try:
import asyncio
from crawl4ai import AsyncWebCrawler

async def main():
    async with AsyncWebCrawler() as crawler:
        result = await crawler.arun(url="https://example.com")
        print(result.markdown)

asyncio.run(main())
Run it, and you get clean Markdown straight to your console:
# Example Domain
This domain is for use in documentation examples without needing permission. Avoid use in operations.
[Learn more](https://iana.org/domains/example)
Let me explain to you what the code does, line by line:
- AsyncWebCrawler() is the entry point, used as an async context manager so the browser starts up and shuts down cleanly around your crawl
- arun(url=...) launches a real Chromium browser, loads the page, renders any JavaScript, and returns a result object
- result.markdown is the cleaned Markdown version of the page
One small but useful detail about that last line. In the current version, result.markdown is a string-compatible object, which means you can print it directly like a string (as above), and it just works. It also carries the richer forms underneath it, result.markdown.raw_markdown and result.markdown.fit_markdown, which is where we're going next.
Understanding Crawl4AI output (raw_markdown vs fit_markdown)
This is the concept that separates Crawl4AI from a generic scraper, and it is the one most tutorials skip.
A crawl gives you two flavors of Markdown:
- raw_markdown, which is the whole page converted faithfully
- fit_markdown, which is the same page with the boilerplate stripped out
For anything headed into an LLM, fit_markdown is the one that saves you money, because you are not paying tokens to embed navigation menus and cookie banners.
The gotcha (fit_markdown is empty until you attach a filter)
fit_markdown is empty by default. If you crawl a page and check result.markdown.fit_markdown, you get an empty string, a fitMarkdownLength of 0, and a lot of confusion. I've seen this show up in Reddit threads constantly. To be clear, that is not a Crawl4AI bug.
fit_markdown is populated only when you attach a content filter to the Markdown generator. Without a filter, Crawl4AI has no instructions on what counts as boilerplate, so it leaves the fit version blank.
The fix is to pass a content filter into DefaultMarkdownGenerator, and Crawl4AI ships two:
- PruningContentFilter: Scores and prunes low-value DOM nodes heuristically
- BM25ContentFilter: Keeps the parts of the page most relevant to a query you supply
For general boilerplate removal, pruning is the one to reach for:
import asyncio
from crawl4ai import AsyncWebCrawler, CrawlerRunConfig, CacheMode
from crawl4ai.markdown_generation_strategy import DefaultMarkdownGenerator
from crawl4ai.content_filter_strategy import PruningContentFilter

async def main():
    config = CrawlerRunConfig(
        cache_mode=CacheMode.BYPASS,
        markdown_generator=DefaultMarkdownGenerator(
            content_filter=PruningContentFilter()
        ),
    )
    async with AsyncWebCrawler() as crawler:
        result = await crawler.arun(url="https://docs.crawl4ai.com", config=config)
        print("raw_markdown:", len(result.markdown.raw_markdown), "chars")
        print("fit_markdown:", len(result.markdown.fit_markdown), "chars")

asyncio.run(main())
The token saving is not theoretical.
I ran this against the Crawl4AI documentation homepage, and here is what came back:
raw_markdown: 13863 chars
fit_markdown: 5308 chars
That is a 62% reduction on a page that is already cleaner than most commercial sites you will crawl. On a news article wrapped in ads, related-article rails, and a newsletter modal, the gap is usually wider.
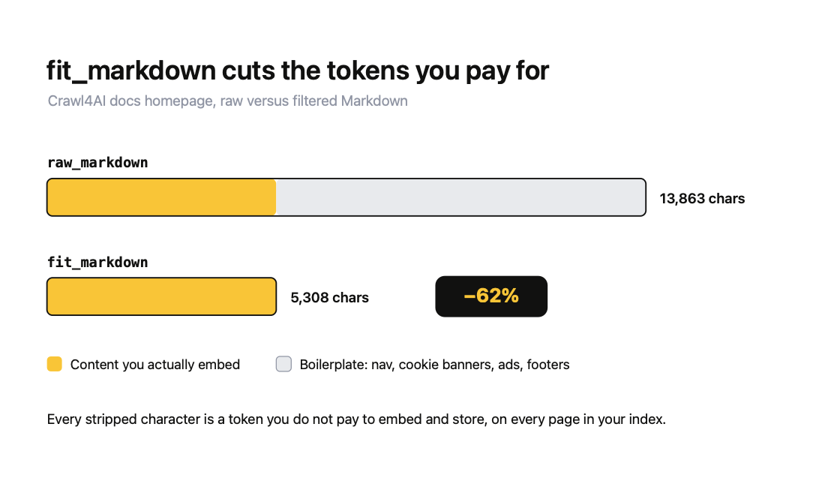
Every one of those stripped characters is tokens that you would otherwise pay to embed and store, multiplied by every page in your index. This is exactly why fit_markdown is the bridge to the RAG section: it is what makes feeding a crawl into a vector database affordable.
If you want to see the filtered Markdown rather than measure it, ScrapingBee's Markdown scraper returns the same kind of LLM-ready output as a hosted API, which is a useful sanity check when deciding whether your local filter is pulling its weight.
However, knowing which Markdown you want is half the battle. The other half is controlling how the crawler behaves in the first place, which comes down to two configuration objects.
Configuring the Crawl4AI crawler (BrowserConfig and CrawlerRunConfig)
Almost every Crawl4AI option lives on one of two config objects, and knowing which is which saves you a lot of guessing:
- BrowserConfig controls the browser and applies to the crawler's whole lifetime
- CrawlerRunConfig controls a single crawl and can change from one arun call to the next
Get that split straight, and the rest of the API stops feeling like a grab bag.
The two-config mental model
The rule is about lifetime.
Anything that describes the browser itself (whether it runs headless, which browser type, proxy settings, stealth mode) belongs on BrowserConfig, because you set the browser up once and reuse it.
Anything that describes a specific crawl (caching, which Markdown generator to use, which extraction strategy, whether to deep-crawl, whether to grab a screenshot or PDF) belongs in CrawlerRunConfig, because those choices can differ per page.
Here is the pattern with both in play:
import asyncio
from crawl4ai import AsyncWebCrawler, BrowserConfig, CrawlerRunConfig, CacheMode

# Browser-level: set once, applies for the crawler's lifetime
browser_config = BrowserConfig(
    headless=True,
    browser_type="chromium",
    verbose=False,
)

# Run-level: applies to this crawl, can change per arun() call
run_config = CrawlerRunConfig(
    cache_mode=CacheMode.BYPASS,
)

async def main():
    async with AsyncWebCrawler(config=browser_config) as crawler:
        result = await crawler.arun(url="https://example.com", config=run_config)
        print(result.success)

asyncio.run(main())
The BrowserConfig goes to the AsyncWebCrawler constructor. The CrawlerRunConfig goes to arun. Once that click happens, everything else in this guide (the content filter from the last section, the extraction strategies and deep-crawl strategies coming up) is just something you attach to the run config.
Reading the CrawlResult object
Every arun call returns a CrawlResult, and readers hit the docs looking for what is on it more than almost anything else.
Here are the fields you will use, with the values I got back crawling example.com:
| Attribute | What it holds | Example value |
|---|---|---|
| result.success | Whether the crawl succeeded | True |
| result.status_code | HTTP status code | 200 |
| result.markdown.raw_markdown | Full page as Markdown | the whole page |
| result.markdown.fit_markdown | Boilerplate-stripped Markdown (needs a content filter) | filtered page |
| result.extracted_content | JSON string from an extraction strategy | [{...}] |
| result.cleaned_html | Sanitized HTML, scripts and styles removed | 283 chars |
| result.links | Internal and external links, as a dict | {"internal": [...], "external": [...]} |
| result.metadata | Page metadata (title, description, and more) | {"title": "Example Domain", ...} |
One thing you should know from my testing: result.links comes back as a dict split into internal and external, not a flat list. On example.com, there was zero internal and one external link, with the metadata title reading Example Domain, exactly as the page shows.
When you are debugging a crawl that returned nothing useful, result.success and result.status_code are the first two things to check, before you touch a single selector.
With the crawler configured and the result object mapped, you have everything you need to stop just reading pages and start extracting structured data from them.
How to extract structured data with Crawl4AI
Clean Markdown is enough when you want to feed a whole page to an LLM. When you want specific fields (product names, prices, article titles) as structured JSON, you attach an extraction strategy to the run config.
Crawl4AI gives you two very different ways to do this:
- A fast, free, deterministic path using CSS selectors
- A flexible, slower, sometimes-paid path using an LLM
They are good at different things, and the last part of this section is a straight decision rule for picking between them.
Method #1: Extract with CSS and JSON (no LLM)
When a page has predictable, repeating markup, CSS extraction is the right tool. You define a schema with a baseSelector (the repeating container) and a list of fields, each with its own selector, and Crawl4AI returns clean JSON.
No LLM, API key, or per-page cost, and the output is deterministic, so the same page always gives you the same result.
Here is a schema that pulls the title, price, and availability from each book on a listing page, and the run config that wires it up:
import asyncio
import json
from crawl4ai import AsyncWebCrawler, CrawlerRunConfig, CacheMode
from crawl4ai.extraction_strategy import JsonCssExtractionStrategy

schema = {
    "name": "Books",
    "baseSelector": "article.product_pod",
    "fields": [
        {"name": "title", "selector": "h3 a", "type": "attribute", "attribute": "title"},
        {"name": "price", "selector": ".price_color", "type": "text"},
        {"name": "availability", "selector": ".availability", "type": "text"},
    ],
}

async def main():
    config = CrawlerRunConfig(
        cache_mode=CacheMode.BYPASS,
        extraction_strategy=JsonCssExtractionStrategy(schema),
    )
    async with AsyncWebCrawler() as crawler:
        result = await crawler.arun(url="https://books.toscrape.com/", config=config)
        books = json.loads(result.extracted_content)
        print(f"extracted {len(books)} books")
        print(json.dumps(books[:3], indent=2))

asyncio.run(main())
When I ran this against books.toscrape.com, it pulled all 20 books off the first page.
The first three came back like this:
[
  {"title": "A Light in the Attic", "price": "£51.77", "availability": "In stock"},
  {"title": "Tipping the Velvet", "price": "£53.74", "availability": "In stock"},
  {"title": "Soumission", "price": "£50.10", "availability": "In stock"}
]
One detail people often miss in the schema is the field type.
Use "type": "text" for the visible text of an element, and "type": "attribute" with an "attribute" key when the value lives in an HTML attribute rather than the text. The book titles here sit in the title attribute of the link, not its visible text, which is why the title field uses attribute while price and availability use text.
If you get that wrong, the field comes back empty, which is the most common reason a CSS schema "does not work."
Method #2: Extract with an LLM (and run it free with Ollama)
When the markup is messy, inconsistent, or free-form (think a blog post where the author, date, and key points are not in tidy repeating elements), CSS selectors break down. This is where LLM extraction earns its place. You describe the data's shape with a Pydantic model, and the LLM reads the page and fills it in.
However, there is one thing you should know about LLM extraction in Crawl4AI: you do not need a paid API key.
Crawl4AI uses LiteLLM under the hood, which means you can point it at any provider, including a model running locally on your own machine through Ollama.
Set the provider to ollama/ and pass api_token=None; the extraction runs fully locally and is fully free:
import asyncio
from pydantic import BaseModel, Field
from crawl4ai import AsyncWebCrawler, CrawlerRunConfig, LLMConfig, CacheMode
from crawl4ai.extraction_strategy import LLMExtractionStrategy

class Article(BaseModel):
    title: str = Field(..., description="the article title")
    author: str = Field(..., description="the author's name")
    summary: str = Field(..., description="a one-sentence summary")

llm_strategy = LLMExtractionStrategy(
    llm_config=LLMConfig(
        provider="ollama/llama3.3",   # a local model, no API key
        api_token=None,               # nothing to pay, nothing to leak
    ),
    schema=Article.model_json_schema(),
    extraction_type="schema",
    instruction="Extract the article's title, author, and a one-sentence summary.",
)

async def main():
    config = CrawlerRunConfig(cache_mode=CacheMode.BYPASS, extraction_strategy=llm_strategy)
    async with AsyncWebCrawler() as crawler:
        result = await crawler.arun(url="https://example.com", config=config)
        print(result.extracted_content)

asyncio.run(main())
Swap the provider string for openai/gpt-4o-mini, anthropic/claude-3-5-sonnet or any other LiteLLM-supported model, pass the matching key, and the same code runs against a hosted model instead.
The tradeoff is that it is slower (you are waiting on model inference per page) and, with a hosted provider, it costs money for every page you extract. For a few hundred messy pages, it is a lifesaver. For a million tidy product listings, CSS extraction is faster and free.
I verified this on Crawl4AI v0.9.1: the LLMExtractionStrategy, LLMConfig, and Pydantic-schema wiring above construct and validate correctly, with api_token=None confirming the no-key local path. A live extraction run also requires Ollama (or a hosted key) to be running on your machine.
Choose the right extraction strategy
The decision is not "which is best," it is "which fits this page."
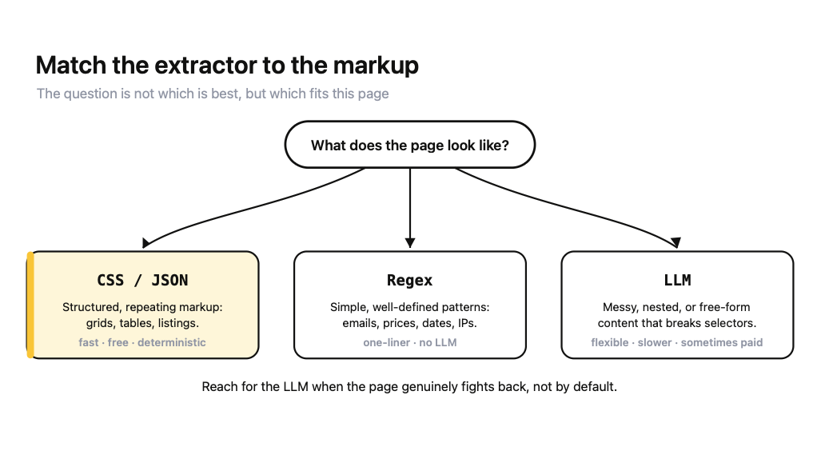
Keep this short rule handy; it covers almost every case:
- Use CSS/JSON extraction when the markup is structured and consistent (product grids, tables, listing pages). It is fast, free, deterministic, and it never hallucinates a field.
- Use regex extraction when you want simple, well-defined patterns rather than page structure. Crawl4AI ships a RegexExtractionStrategy with built-in patterns for emails, phone numbers, currencies, dates, IPs, and more, so pulling every email off a page is a one-liner, no LLM required.
- Use LLM extraction when the content is messy, nested, or free-form, and selectors would break on the next page that is laid out slightly differently. Accept the cost and latency in exchange for not maintaining brittle selectors.
The instinct to reach for the LLM first is worth resisting. Most extraction jobs are more structured than they look, and a CSS schema you write once will outrun and out-price an LLM on every page after the first. Reach for the LLM when the page genuinely fights back, not by default.
With the data coming out in the shape you want, the next question is that how do you crawl more than one page at a time?
How to deep crawl multiple pages with Crawl4AI
Everything we've done so far has crawled a single URL.
Deep crawling is how you follow links from a starting page and crawl a whole section of a site, which is what you want when you are indexing documentation, a blog, or a product catalog, rather than one page.
Crawl4AI handles this with a deep-crawl strategy that you can attach to the run config, giving you real control over how far and how wide it goes.
1. Crawl with BFSDeepCrawlStrategy
The most common strategy is breadth-first. You crawl the starting page, then every page it links to, then every page those link to, level by level, and BFSDeepCrawlStrategy does that. You give it a depth limit and a page cap, attach it to the run config, and arun returns a list of results instead of a single one.
Let me show you how:
import asyncio
from crawl4ai import AsyncWebCrawler, CrawlerRunConfig, CacheMode
from crawl4ai.deep_crawling import BFSDeepCrawlStrategy

async def main():
    config = CrawlerRunConfig(
        cache_mode=CacheMode.BYPASS,
        deep_crawl_strategy=BFSDeepCrawlStrategy(
            max_depth=1,            # how many link-levels deep to go
            max_pages=5,            # hard cap on total pages
            include_external=False, # stay on the same domain
        ),
    )
    async with AsyncWebCrawler() as crawler:
        results = await crawler.arun(url="https://docs.crawl4ai.com", config=config)
        print(f"crawled {len(results)} pages")
        for page in results:
            depth = page.metadata.get("depth", "?")
            print(f"  depth {depth}: {page.url}")

asyncio.run(main())
Here, we point at the Crawl4AI documentation with max_depth=1 and max_pages=5, it crawled the start page plus four of its linked pages:
crawled 5 pages
  depth 0: https://docs.crawl4ai.com
  depth 1: https://docs.crawl4ai.com/core/ask-ai/
  depth 1: https://docs.crawl4ai.com/core/quickstart/
  depth 1: https://docs.crawl4ai.com/stats/
  ...
There are two things worth noticing here:
(1) First, results is a list, and you iterate over it like any crawl result, each item carrying its own Markdown, links, and metadata
(2) Second, each page's metadata["depth"] tells you how many hops from the start it was, which is how you keep your bearings when the crawl fans out. The start page is depth 0; everything it links to is depth 1, and so on.
2. Control depth and breadth
The two knobs you will reach for first are max_depth and max_pages, and they answer different questions:
- max_depth controls how many link-levels deep the crawl travels
- max_pages is a hard ceiling on total pages, regardless of depth
Set both. Depth alone can explode on a densely linked site, and a page cap is your safety net against accidentally crawling ten thousand URLs.
Beyond those, deep crawling gives you finer control:
- Strategy choice: BFSDeepCrawlStrategy (breadth-first) is the sensible default. There is also a depth-first strategy for going deep down one path before backtracking, and a best-first strategy that uses a scorer to crawl the most relevant links first.
- include_external: Keep this False to stay on the starting domain. Flip it to True only when you genuinely want to follow links off-site, which almost always crawls more than you meant to.
- Filters: A FilterChain lets you restrict which URLs are crawled by domain, URL pattern, or content type so that you can skip login pages and asset directories.
- Scorers and score_threshold: With the best-first strategy, a scorer ranks links by relevance to a keyword or query, and score_threshold drops anything below a cutoff, so you spend your page budget on the pages that matter.
The practical way to think about it is that BFS with a sane max_pages gets you most of the way there, and you add filters and scorers when a crawl pulls in pages you do not want. In my experience, you should start simple, tighten when the results tell you to.
Deep crawling collects everything within your limits. Sometimes what you want is to stop the moment you have enough, which is a different idea entirely.
Adaptive crawling with Crawl4AI (knowing when to stop)
Deep crawling asks, "How much of this site should I crawl?"
Adaptive crawling asks a smarter question: "Have I gathered enough to answer the query, and can I stop now?"
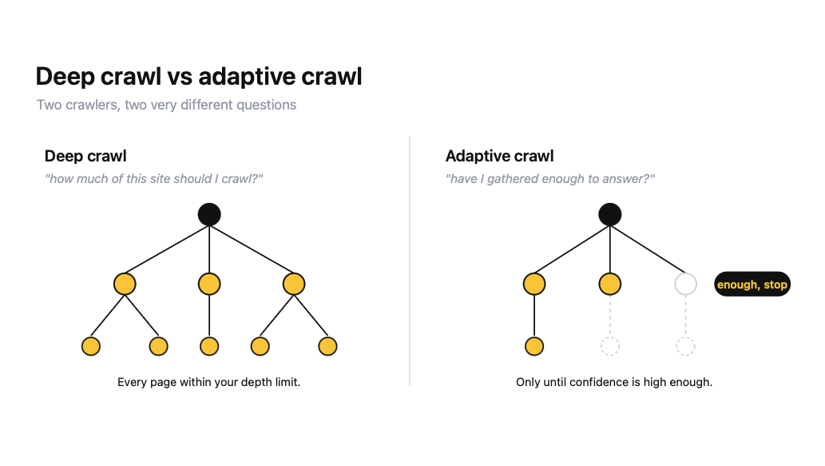
This is information foraging. Instead of crawling everything within a depth limit, you give it a query, and it keeps crawling only until it is confident it has the relevant content, then stops.
Running your adaptive crawl
For building a focused knowledge base rather than mirroring a whole site, this saves a lot of wasted crawling.
The API is AdaptiveCrawler.digest(), which takes a starting URL and a query:
import asyncio
from crawl4ai import AsyncWebCrawler, AdaptiveCrawler

async def main():
    async with AsyncWebCrawler() as crawler:
        adaptive = AdaptiveCrawler(crawler)
        result = await adaptive.digest(
            start_url="https://docs.python.org/3/library/asyncio.html",
            query="async await coroutines event loop",
        )
        print(f"confidence: {adaptive.confidence:.0%}")
        for page in adaptive.get_relevant_content(top_k=3):
            print(f"  {page['score']:.0%} - {page['url']}")

asyncio.run(main())
I ran this against the Python asyncio documentation with the query "async await coroutines event loop", it reported a confidence of 70% and surfaced the most relevant page it found:
confidence: 70%
  40% - https://docs.python.org/3/library/asyncio.html
The number that drives everything is confidence.
How the Crawl4AI confidence score is calculated
Under the hood, Crawl4AI scores the crawl on a few signals as it goes:
- Coverage: How much of the query's information space it has seen
- Consistency: Whether new pages agree with what it already has
- Saturation: Whether new pages are still adding anything
When those combine to a high enough confidence level, it stops because crawling more would not teach it anything new. get_relevant_content(top_k=...) then hands you the best pages it found, ranked by score, ready to drop into whatever you are building.
The mental shift is the point. Deep crawling is for "give me this whole section." Adaptive crawling is for "give me enough to answer this, and do not waste requests once you have it." When you are assembling context for a specific question rather than archiving a site, adaptive mode respects both your time and the target server's.
Everything up to here has been about getting clean, structured content out of the web. The reason that matters for most people reading this is what happens next: feeding it to an LLM.
Real-world application of Crawl4AI (RAG and LLM pipelines)
This is the reason Crawl4AI exists. A retrieval-augmented generation (RAG) pipeline is only as good as the text you put into it, and most scrapers hand you HTML that you then have to clean before an LLM can use it.
Crawl4AI's clean Markdown skips that step, which is why it slots directly into the tools people use to build RAG: LangChain document loaders, LlamaIndex, and vector databases like Milvus, Qdrant, and Supabase.
The fit_markdown output from earlier is what makes this affordable, because you are embedding and storing content, not boilerplate.
Crawling to a vector store
The end-to-end path is short. You crawl a page to fit_markdown, split it into chunks, embed the chunks, and store them in a vector database.
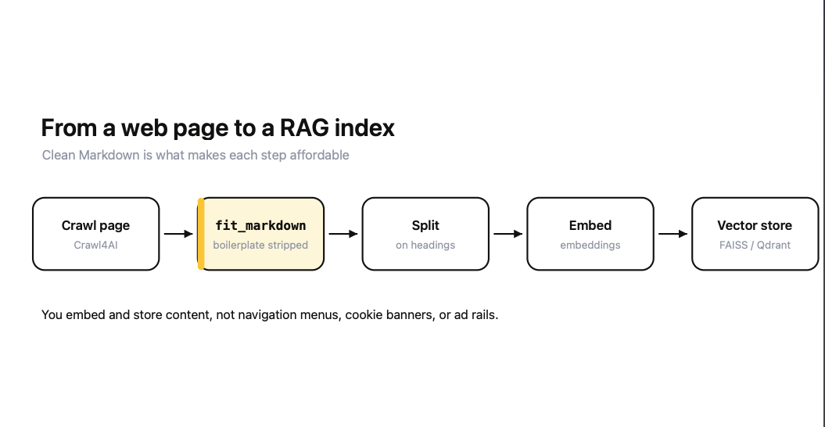
Let's look at the shape of it, using LangChain and an in-memory store to keep the example focused on the integration rather than the infrastructure:
import asyncio
from crawl4ai import AsyncWebCrawler, CrawlerRunConfig, CacheMode
from crawl4ai.markdown_generation_strategy import DefaultMarkdownGenerator
from crawl4ai.content_filter_strategy import PruningContentFilter
from langchain_text_splitters import MarkdownHeaderTextSplitter
from langchain_community.vectorstores import FAISS
from langchain_openai import OpenAIEmbeddings

async def crawl_to_markdown(url):
    config = CrawlerRunConfig(
        cache_mode=CacheMode.BYPASS,
        markdown_generator=DefaultMarkdownGenerator(
            content_filter=PruningContentFilter()
        ),
    )
    async with AsyncWebCrawler() as crawler:
        result = await crawler.arun(url=url, config=config)
        return result.markdown.fit_markdown  # token-efficient, boilerplate stripped

# 1. Crawl to clean, filtered Markdown
markdown = asyncio.run(crawl_to_markdown("https://docs.crawl4ai.com"))

# 2. Split on Markdown headings so chunks stay semantically whole
splitter = MarkdownHeaderTextSplitter(
    headers_to_split_on=[("#", "h1"), ("##", "h2"), ("###", "h3")]
)
chunks = splitter.split_text(markdown)

# 3. Embed and store
store = FAISS.from_documents(chunks, OpenAIEmbeddings())
store.save_local("crawl4ai_index")
Splitting on Markdown headings is the small move that matters here.
Because Crawl4AI already gave you clean headings, a heading-aware splitter keeps each chunk semantically whole (a section stays with its heading) instead of cutting mid-thought at an arbitrary character count.
If you prefer a different chunking approach, Crawl4AI also ships its own chunking strategies (sliding window, overlapping window, sentence and topic-based) that you can apply before embedding.
Swap OpenAIEmbeddings and FAISS for a local embedding model and Milvus, Qdrant, or Supabase, and the shape stays identical. This is an integration path, not a full RAG tutorial, but it is the whole pattern in fifteen lines.
Calling Crawl4AI from an AI agent with its MCP server
If you are building agents rather than pipelines, Crawl4AI's server deployment ships a built-in MCP (Model Context Protocol) server, which lets an AI agent call the crawler directly as a tool.
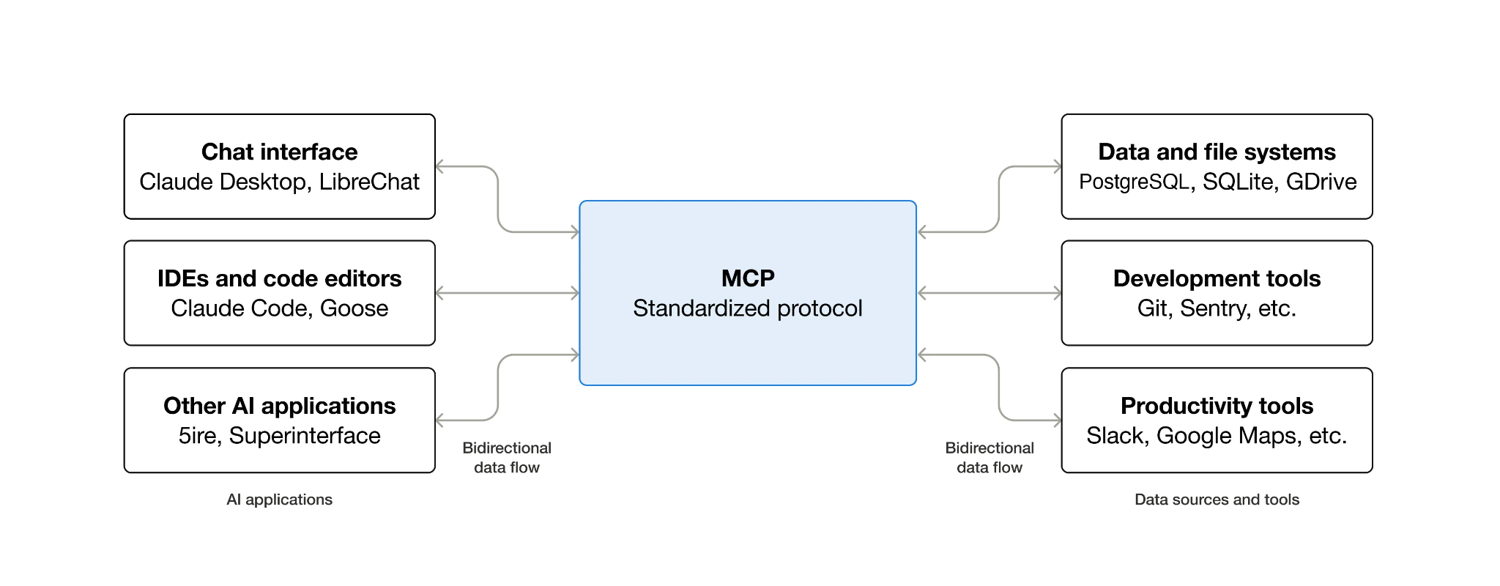
Run the Docker deployment (the one referenced back in the install section), and it exposes MCP endpoints that agent frameworks and tools like Claude Code can connect to, so your agent can crawl a page mid-conversation and reason over the result without you wiring up a custom fetch step.
The official Crawl4AI documentation contains the current endpoint details, which are worth checking against your version, as this part of the project is evolving quickly.
For teams that want the same LLM-ready output without running any of this infrastructure, ScrapingBee's AI web scraping API returns Markdown and natural-language extractions from a hosted endpoint, which is the zero-ops version of the same idea.
Feeding clean content to an LLM is the happy path. The unhappy path is the target that does not want to be crawled at all, and that is where Crawl4AI's honest limits start to matter.
When Crawl4AI gets blocked (proxies, stealth, and anti-bot)
Crawl4AI has real tools for looking less like a bot, and they help against basic defenses. What it does not have is any guarantee of getting past serious anti-bot systems, and no amount of configuration changes can change that.
If you have read that Crawl4AI "bypasses Cloudflare," I'll tell you to set that expectation aside now, because it will cost you a day or days of debugging when you find out otherwise.
First, let's check out the possibilities.
Configuring proxies and stealth mode
Crawl4AI gives you two levers for evasion: Stealth mode sits on BrowserConfig, while proxies are configured per request on CrawlerRunConfig.proxy_config (BrowserConfig's older plain-string proxy argument still works but is deprecated in favor of proxy_config):
- Stealth mode patches the browser to hide the most obvious automation signals (the navigator.webdriver flag and similar tells) using playwright-stealth under the hood
- Proxy configuration routes your requests through a different IP address, so you are not hammering a target from a single address
You turn stealth on with a flag on the browser config, and pass proxy details on the run config:
from crawl4ai import AsyncWebCrawler, BrowserConfig, CrawlerRunConfig

browser_config = BrowserConfig(
    headless=True,
    enable_stealth=True,  # patches obvious automation signals via playwright-stealth
)

run_config = CrawlerRunConfig(
    proxy_config={
        "server": "http://your-proxy.example.com:8080",
        "username": "your-username",
        "password": "your-password",
    },
)

# stealth is set once on the browser; the proxy is applied per request
async with AsyncWebCrawler(config=browser_config) as crawler:
    result = await crawler.arun(url="https://example.com", config=run_config)
Crawl4AI also ships an undetected-browser adapter for harder targets and, in recent versions, an automatic anti-bot escalation that ramps up evasion when it detects a challenge. Those raise your odds against mid-tier defenses.
One limitation to keep in mind before architecting around proxies is that Crawl4AI runs on Playwright, which supports HTTP, HTTPS, and unauthenticated SOCKS5 proxies but not SOCKS5 proxies that require a username and password.
If your proxy provider hands you authenticated SOCKS5 endpoints, they will not work here, which is the kind of thing you want to find out before you buy a plan, not after.
Knowing what Crawl4AI cannot do (and where a managed layer slots in)
Crawl4AI ships no managed proxies. It gives you the hooks to plug in your own proxies, but you are the one sourcing, rotating, and paying for them. And against advanced anti-bot systems (Cloudflare's tougher tiers, DataDome, and similar), stealth mode and a datacenter proxy are not enough.
This is not a Crawl4AI failing so much as a reality of self-hosted crawling. The project itself has open discussions of pages that Crawl4AI gets blocked on, while a managed service gets through. What you need at that point is residential proxies (real consumer IPs) and, for the hardest targets, a service whose whole job is unblocking.
This is exactly where a managed layer fits.
Using a managed API layer
Crawl4AI gives you control, and control is worth a lot. The cost of that control is that you run and maintain everything: the Playwright browsers, the proxy pool, the unblocking, the cloud instances that keep getting their IPs flagged.
When that maintenance starts eating more of your week than the data is worth, a managed API layer like ScrapingBee takes it off your plate. There are two honest ways to bring it in.
Method #1: Using ScrapingBee as the fallback fetch behind Crawl4AI
You can keep Crawl4AI as your crawler. When a page comes back blocked, route just that request through ScrapingBee's API, which handles residential proxies, headless rendering, and anti-bot unblocking for you. You keep the free self-hosted crawler for the 90% of pages that work fine, and pay only for the hard 10%.
In practice, this is a few lines of glue. Check result.success (or scan the response for a challenge page or a 403), and on failure, re-fetch that one URL through ScrapingBee before moving on.
Your crawl loop, parsing, and storage stay the same; only the fetch step changes, and only for the pages that fought back. The result is a bill that scales with difficulty rather than volume, because the vast majority of URLs never leave the free, self-hosted path.
Method #2: Using ScrapingBee as a zero-infrastructure alternative
If you would rather not run browsers and proxies at all, ScrapingBee returns the same LLM-ready output from a hosted endpoint. Pass return_page_markdown=true, and you get clean Markdown back, the same shape Crawl4AI produces, with no Playwright to install.
You can also hand it a plain-English instruction with ai_query, and it returns structured data directly:
import httpx

params = {
    "api_key": "YOUR_SCRAPINGBEE_KEY",
    "url": "https://books.toscrape.com/",
    "ai_query": "Return the title and price of the first 3 books as JSON",
}

response = httpx.get("https://app.scrapingbee.com/api/v1/", params=params, timeout=60)
print(response.text)
I ran this against the same book listing used earlier in this guide, which returned clean JSON with no schema and no selectors:
[
  {"title": "A Light in the Attic", "price": "£51.77"},
  {"title": "Tipping the Velvet", "price": "£53.74"},
  {"title": "Soumission", "price": "£50.10"}
]
ScrapingBee earns its keep at the exact moment the proxy and unblocking maintenance becomes the bottleneck rather than the crawling.
Skip the proxy and infra headaches with ScrapingBee
Everything in this guide comes back to one trade-off. Crawl4AI gives you clean, LLM-ready output and full control over your pipeline, but that control ships browsers, the proxy pool, and the anti-bot unblocking you now have to run and keep alive.
Here is what ScrapingBee handles for your entire scraping infrastructure:
- Residential and data center proxy rotation: Real consumer IPs rotate per request, so a flagged cloud IP stops being your problem.
- JavaScript rendering: A full headless browser for React, Vue, and Next.js pages, without you installing or maintaining Playwright.
- Anti-bot unblocking: CAPTCHA handling and stealth fingerprints managed for you, including on the Cloudflare and DataDome targets, where self-hosted stealth cannot clear.
- LLM-ready Markdown: return_page_markdown=true returns the same clean Markdown shape Crawl4AI produces, straight from the API.
- Natural-language extraction: ai_query and ai_extract_rules pull structured data from a plain-English prompt, no schema or selectors to maintain.
Start on ScrapingBee with 1,000 free API credits, no credit card required, and see where that line falls for your own targets.
Frequently asked questions on Crawl4AI
Is Crawl4AI free?
Yes. Crawl4AI is fully open-source under the Apache 2.0 license and free for personal and commercial use, with no subscription or API key required. You only pay for the infrastructure you run it on, any proxies you add, and third-party LLM calls if you choose LLM-based extraction over the free CSS or regex strategies.
Does Crawl4AI need an API key or an LLM?
No, not for basic crawling and Markdown generation, which work with zero keys. An LLM is only needed for LLM-based extraction, and even that can run fully locally and for free using a model like Llama through Ollama, with no key required. CSS and regex extraction never touch an LLM.
Crawl4AI vs Firecrawl, which should I use?
Crawl4AI is free, open-source, and self-hosted, giving you maximum control but leaving you to manage Playwright, proxies, and infrastructure. Firecrawl is a managed API that returns LLM-ready output with no ops, priced per credit. Choose Crawl4AI for control and zero license cost, and a managed API like Firecrawl or ScrapingBee for zero infrastructure.
Can Crawl4AI bypass Cloudflare and anti-bot systems?
Partially. Crawl4AI offers stealth mode, an undetected browser adapter, proxy support, and automatic escalation, which clear basic protection. But it ships no managed proxies and cannot guarantee bypass of advanced systems like Cloudflare or DataDome. For those, you add your own residential proxies or route blocked requests through a managed unblocking layer.
Does Crawl4AI handle JavaScript?
Yes. Crawl4AI runs on Playwright, launching a real headless Chromium browser that fully renders JavaScript, dynamic content, and single-page apps before extraction. You can also run custom JavaScript, wait for specific selectors, scroll to trigger lazy-loaded content, and persist sessions and cookies across multiple requests.
Can I use Crawl4AI with RAG and LangChain?
Yes. Crawl4AI's clean Markdown and JSON feeds directly into LangChain document loaders, LlamaIndex, and vector databases such as Milvus, Qdrant, or Supabase. Its fit_markdown output strips boilerplate to cut token costs, and its server deployment ships a built-in MCP server so AI agents can call the crawler directly.

Ismail is a Senior Managing Editor and Senior AI Workflow Engineer. For a decade, he has turned the trickiest corners of web scraping, Python, content marketing, and AI infrastructure into guides readers keep open in a second tab. He builds the tools before he documents them, breaks them, and reports back with the scars.